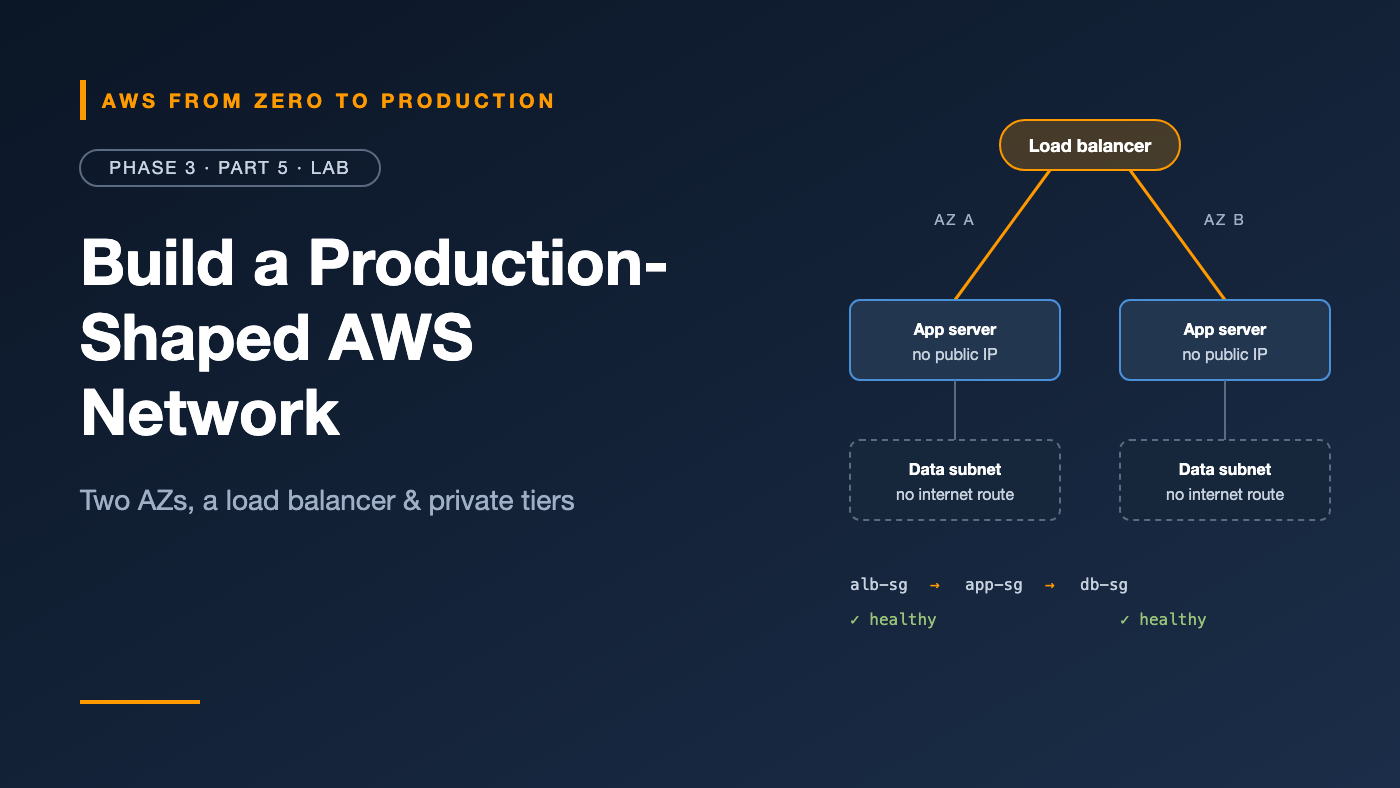
AWS from Zero to Production — Phase 3, Part 5 of 5 · See the full series roadmap
Most AWS tutorials launch an EC2 instance in the default VPC, give it a public IP, and call it a day.
That’s not how production works. In production, nothing gets a public IP unless it absolutely must. Users reach a load balancer. The load balancer reaches the app. The app reaches the database. Every hop is explicitly allowed — and everything else is blocked.
In this lab, you’ll build exactly that, one command at a time. By the end, you’ll understand every route and every rule — because you wrote them.
What you’ll build
- 🏠 A custom VPC (
10.0.0.0/16) across two Availability Zones - 🧩 Six subnets: public, private app, and isolated data — in each AZ
- 🧭 An internet gateway and three route tables
- 🛡️ Three chained security groups: load balancer → app → database
- 🖥️ Two app servers in private subnets, with no public IP addresses
- ⚖️ An internet-facing Application Load Balancer spreading traffic across both AZs
- 🗄️ A database subnet group, ready for RDS in Phase 5
- 🪣 A free S3 gateway endpoint
                 Internet
                    |
             Internet gateway
                    |
      Application Load Balancer (public subnets)
          |                         |
   AZ a                       AZ b
   public 10.0.1.0/24         public 10.0.2.0/24
   app    10.0.11.0/24        app    10.0.12.0/24
     [app server]               [app server]       no public IPs
   data   10.0.21.0/24        data   10.0.22.0/24
     (database in Phase 5)                         no internet route
Prerequisites
- Your Phase 1 sandbox with the
sandboxCLI profile, and permissions for EC2, Elastic Load Balancing, and RDS - AWS CLI v2
- A bash or zsh terminal (macOS, Linux, or AWS CloudShell)
- About 60–90 minutes
Cost note: The Application Load Balancer and the two small EC2 instances are billed by the hour, and the load balancer’s public IPv4 addresses are charged too. Finished within an afternoon, this lab typically costs a small amount — but it keeps charging until you run Cleanup. The optional NAT gateway step adds more. Check current pricing and Free Tier eligibility before you start.
On Windows? Use AWS CloudShell from the console. It has the AWS CLI and bash ready to go.
Keep one terminal open. Each step saves IDs in shell variables that later steps use. If you lose them, every resource is tagged with a
lab-name, so you can find it in the console.
Step 1: Set your profile, Region, and Availability Zones
export AWS_PROFILE=sandbox
export AWS_REGION=us-east-1

AZ_A=$(aws ec2 describe-availability-zones \
  --query 'AvailabilityZones[0].ZoneName' --output text)
AZ_B=$(aws ec2 describe-availability-zones \
  --query 'AvailabilityZones[1].ZoneName' --output text)

echo "$AZ_A $AZ_B"
✅ Checkpoint: You see two different AZ names, like us-east-1a us-east-1b.
Step 2: Create the VPC
VPC_ID=$(aws ec2 create-vpc \
  --cidr-block 10.0.0.0/16 \
  --tag-specifications 'ResourceType=vpc,Tags=[{Key=Name,Value=lab-vpc}]' \
  --query Vpc.VpcId --output text)

aws ec2 modify-vpc-attribute --vpc-id "$VPC_ID" \
  --enable-dns-hostnames '{"Value":true}'

echo "$VPC_ID"
DNS hostnames let resources in the VPC get DNS names — needed later for RDS and VPC endpoints.
✅ Checkpoint: You have a vpc-... ID.
Step 3: Create six subnets
A small helper keeps this readable:
make_subnet() {
  aws ec2 create-subnet \
    --vpc-id "$VPC_ID" \
    --cidr-block "$1" \
    --availability-zone "$2" \
    --tag-specifications "ResourceType=subnet,Tags=[{Key=Name,Value=$3}]" \
    --query Subnet.SubnetId --output text
}

SUBNET_PUB_A=$(make_subnet 10.0.1.0/24  "$AZ_A" lab-public-a)
SUBNET_PUB_B=$(make_subnet 10.0.2.0/24  "$AZ_B" lab-public-b)
SUBNET_APP_A=$(make_subnet 10.0.11.0/24 "$AZ_A" lab-app-a)
SUBNET_APP_B=$(make_subnet 10.0.12.0/24 "$AZ_B" lab-app-b)
SUBNET_DATA_A=$(make_subnet 10.0.21.0/24 "$AZ_A" lab-data-a)
SUBNET_DATA_B=$(make_subnet 10.0.22.0/24 "$AZ_B" lab-data-b)
At this point, all six subnets are identical. None is public yet — that’s decided by routing in the next step.
✅ Checkpoint: In the VPC console, under Subnets, filter by lab- and see six subnets across two AZs.
Step 4: Add the internet gateway and route tables
The public route table
IGW_ID=$(aws ec2 create-internet-gateway \
  --tag-specifications 'ResourceType=internet-gateway,Tags=[{Key=Name,Value=lab-igw}]' \
  --query InternetGateway.InternetGatewayId --output text)

aws ec2 attach-internet-gateway --internet-gateway-id "$IGW_ID" --vpc-id "$VPC_ID"

RT_PUBLIC=$(aws ec2 create-route-table --vpc-id "$VPC_ID" \
  --tag-specifications 'ResourceType=route-table,Tags=[{Key=Name,Value=lab-rt-public}]' \
  --query RouteTable.RouteTableId --output text)

aws ec2 create-route --route-table-id "$RT_PUBLIC" \
  --destination-cidr-block 0.0.0.0/0 --gateway-id "$IGW_ID"

aws ec2 associate-route-table --route-table-id "$RT_PUBLIC" --subnet-id "$SUBNET_PUB_A"
aws ec2 associate-route-table --route-table-id "$RT_PUBLIC" --subnet-id "$SUBNET_PUB_B"
That 0.0.0.0/0 → igw route is the only thing that makes the two public subnets public.
The private app and data route tables
RT_APP=$(aws ec2 create-route-table --vpc-id "$VPC_ID" \
  --tag-specifications 'ResourceType=route-table,Tags=[{Key=Name,Value=lab-rt-app}]' \
  --query RouteTable.RouteTableId --output text)

RT_DATA=$(aws ec2 create-route-table --vpc-id "$VPC_ID" \
  --tag-specifications 'ResourceType=route-table,Tags=[{Key=Name,Value=lab-rt-data}]' \
  --query RouteTable.RouteTableId --output text)

aws ec2 associate-route-table --route-table-id "$RT_APP"  --subnet-id "$SUBNET_APP_A"
aws ec2 associate-route-table --route-table-id "$RT_APP"  --subnet-id "$SUBNET_APP_B"
aws ec2 associate-route-table --route-table-id "$RT_DATA" --subnet-id "$SUBNET_DATA_A"
aws ec2 associate-route-table --route-table-id "$RT_DATA" --subnet-id "$SUBNET_DATA_B"
These tables have only the automatic local route. No internet in either direction.
✅ Checkpoint: In the console, lab-rt-public has a 0.0.0.0/0 route to the internet gateway; lab-rt-app and lab-rt-data have only local.
Step 5: Create chained security groups
ALB_SG=$(aws ec2 create-security-group --vpc-id "$VPC_ID" \
  --group-name lab-alb-sg --description "Load balancer" \
  --query GroupId --output text)

APP_SG=$(aws ec2 create-security-group --vpc-id "$VPC_ID" \
  --group-name lab-app-sg --description "App servers" \
  --query GroupId --output text)

DB_SG=$(aws ec2 create-security-group --vpc-id "$VPC_ID" \
  --group-name lab-db-sg --description "Database" \
  --query GroupId --output text)

# Internet -> load balancer
aws ec2 authorize-security-group-ingress --group-id "$ALB_SG" \
  --protocol tcp --port 80 --cidr 0.0.0.0/0

# Load balancer -> app
aws ec2 authorize-security-group-ingress --group-id "$APP_SG" \
  --protocol tcp --port 80 --source-group "$ALB_SG"

# App -> database (PostgreSQL)
aws ec2 authorize-security-group-ingress --group-id "$DB_SG" \
  --protocol tcp --port 5432 --source-group "$APP_SG"
No IP addresses in the app or database rules — only security group references.
Why HTTP and not HTTPS? HTTPS needs a domain name and an ACM certificate. To keep this lab self-contained, we use HTTP on port 80. In production, add an HTTPS listener on 443 with an ACM certificate and redirect 80 to 443.
✅ Checkpoint: lab-db-sg allows port 5432 only from lab-app-sg.
Step 6: Launch two app servers in private subnets
Create a user data script. It runs once at first boot, writes a page that says which AZ answered, and starts a tiny web server with the Python that’s preinstalled on Amazon Linux 2023:
cat > user-data.sh <<'EOF'
#!/bin/bash
TOKEN=$(curl -s -X PUT "http://169.254.169.254/latest/api/token" \
  -H "X-aws-ec2-metadata-token-ttl-seconds: 300")
AZ=$(curl -s -H "X-aws-ec2-metadata-token: $TOKEN" \
  http://169.254.169.254/latest/meta-data/placement/availability-zone)
mkdir -p /srv/www
echo "Hello from the app tier in $AZ" > /srv/www/index.html
cd /srv/www
nohup python3 -m http.server 80 > /var/log/web.log 2>&1 &
EOF
Lab only:
python3 -m http.serveris fine for a demo, not for production. It lets this lab work without any internet access from the private subnets. Phase 4 deploys a real containerized app.
Launch one instance in each private app subnet:
launch_app() {
  aws ec2 run-instances \
    --image-id resolve:ssm:/aws/service/ami-amazon-linux-latest/al2023-ami-kernel-default-x86_64 \
    --instance-type t3.micro \
    --subnet-id "$1" \
    --security-group-ids "$APP_SG" \
    --metadata-options HttpTokens=required \
    --user-data file://user-data.sh \
    --tag-specifications "ResourceType=instance,Tags=[{Key=Name,Value=$2}]" \
    --query 'Instances[0].InstanceId' --output text
}

INSTANCE_A=$(launch_app "$SUBNET_APP_A" lab-app-a)
INSTANCE_B=$(launch_app "$SUBNET_APP_B" lab-app-b)

aws ec2 wait instance-running --instance-ids "$INSTANCE_A" "$INSTANCE_B"
The resolve:ssm: image ID always picks the latest Amazon Linux 2023 AMI for your Region. HttpTokens=required enforces IMDSv2 — a security best practice covered in Phase 4.
Confirm they have no public IP:
aws ec2 describe-instances --instance-ids "$INSTANCE_A" "$INSTANCE_B" \
  --query 'Reservations[].Instances[].[Tags[?Key==`Name`]|[0].Value,PrivateIpAddress,PublicIpAddress]' \
  --output text
✅ Checkpoint: Each instance shows a 10.0.1x.x private IP and None for the public IP.
Step 7: Create the Application Load Balancer
ALB_ARN=$(aws elbv2 create-load-balancer \
  --name lab-alb \
  --type application \
  --scheme internet-facing \
  --subnets "$SUBNET_PUB_A" "$SUBNET_PUB_B" \
  --security-groups "$ALB_SG" \
  --query 'LoadBalancers[0].LoadBalancerArn' --output text)

TG_ARN=$(aws elbv2 create-target-group \
  --name lab-app-tg \
  --protocol HTTP --port 80 \
  --vpc-id "$VPC_ID" \
  --target-type instance \
  --health-check-path / \
  --query 'TargetGroups[0].TargetGroupArn' --output text)

aws elbv2 register-targets --target-group-arn "$TG_ARN" \
  --targets Id="$INSTANCE_A" Id="$INSTANCE_B"

aws elbv2 create-listener \
  --load-balancer-arn "$ALB_ARN" \
  --protocol HTTP --port 80 \
  --default-actions Type=forward,TargetGroupArn="$TG_ARN"

aws elbv2 wait load-balancer-available --load-balancer-arns "$ALB_ARN"
The load balancer lives in the public subnets. Its targets live in the private subnets. That’s the whole pattern.
Check target health. It can take a minute or two:
aws elbv2 describe-target-health --target-group-arn "$TG_ARN" \
  --query 'TargetHealthDescriptions[].[Target.Id,TargetHealth.State]' \
  --output text
✅ Checkpoint: Both targets show healthy.
Step 8: Test it
ALB_DNS=$(aws elbv2 describe-load-balancers --load-balancer-arns "$ALB_ARN" \
  --query 'LoadBalancers[0].DNSName' --output text)

for i in 1 2 3 4 5 6; do curl -s "http://$ALB_DNS"; done
You should see responses from both Availability Zones:
Hello from the app tier in us-east-1a
Hello from the app tier in us-east-1b
Hello from the app tier in us-east-1a
...
Now prove the app servers aren’t reachable directly. They have no public IP, so there’s nothing on the internet to connect to. That’s not a firewall you could misconfigure — there’s simply no path.
✅ Checkpoint: Responses come from both AZs, and the instances have no public address.
Optional: simulate an AZ failure
aws ec2 stop-instances --instance-ids "$INSTANCE_A"
Wait a minute, then run the curl loop again. After the health check marks the target unhealthy, every response comes from AZ b. Start it again with aws ec2 start-instances --instance-ids "$INSTANCE_A".
Note: After the restart, instance A stays unhealthy. User data runs only at first boot, so the demo web server doesn’t start again. That’s a real-world lesson in itself: design servers to be replaced, not repaired. Phase 4 covers launch templates and Auto Scaling for exactly this.
Step 9: Prepare the database tier
You won’t create a database yet — RDS arrives in Phase 5. But you can prepare its home now, at no cost.
A DB subnet group tells RDS which subnets it may use:
aws rds create-db-subnet-group \
  --db-subnet-group-name lab-db-subnets \
  --db-subnet-group-description "Isolated data subnets for the lab" \
  --subnet-ids "$SUBNET_DATA_A" "$SUBNET_DATA_B"
The database will sit in subnets with no internet route, behind lab-db-sg, which only accepts PostgreSQL traffic from the app tier.
✅ Checkpoint: In the RDS console, Subnet groups shows lab-db-subnets with two subnets in two AZs.
Step 10: Add a free S3 gateway endpoint
Private resources often need S3. A gateway endpoint gives them a private path — at no additional charge:
S3_ENDPOINT=$(aws ec2 create-vpc-endpoint \
  --vpc-id "$VPC_ID" \
  --service-name "com.amazonaws.$AWS_REGION.s3" \
  --route-table-ids "$RT_APP" "$RT_DATA" \
  --query VpcEndpoint.VpcEndpointId --output text)
✅ Checkpoint: lab-rt-app now has a route whose destination is an S3 prefix list (pl-...) and whose target is the endpoint.
Step 11 (optional, costs extra): Add a NAT gateway
If your app servers needed to download packages, they’d need outbound internet. Try it, then delete it promptly:
EIP_ALLOC=$(aws ec2 allocate-address --domain vpc --query AllocationId --output text)

NAT_ID=$(aws ec2 create-nat-gateway \
  --subnet-id "$SUBNET_PUB_A" \
  --allocation-id "$EIP_ALLOC" \
  --query NatGateway.NatGatewayId --output text)

aws ec2 wait nat-gateway-available --nat-gateway-ids "$NAT_ID"

aws ec2 create-route --route-table-id "$RT_APP" \
  --destination-cidr-block 0.0.0.0/0 --nat-gateway-id "$NAT_ID"
Now the app subnets can reach out, but nothing can reach in. The data subnets still have no internet path.
Cost warning: NAT gateways charge per hour and per GB, and the Elastic IP is charged too. In production, use one NAT gateway per AZ for resilience. In this lab, one is enough — and delete it as soon as you’re done.
Cleanup
Delete resources in this order. Dependencies block deletion if you go out of order.
# 1. Load balancer and target group
aws elbv2 delete-load-balancer --load-balancer-arn "$ALB_ARN"
aws elbv2 wait load-balancers-deleted --load-balancer-arns "$ALB_ARN"
aws elbv2 delete-target-group --target-group-arn "$TG_ARN"

# 2. Instances
aws ec2 terminate-instances --instance-ids "$INSTANCE_A" "$INSTANCE_B"
aws ec2 wait instance-terminated --instance-ids "$INSTANCE_A" "$INSTANCE_B"

# 3. NAT gateway and Elastic IP (only if you did Step 11)
aws ec2 delete-nat-gateway --nat-gateway-id "$NAT_ID"
aws ec2 wait nat-gateway-deleted --nat-gateway-ids "$NAT_ID"
aws ec2 release-address --allocation-id "$EIP_ALLOC"

# 4. Endpoint and DB subnet group
aws ec2 delete-vpc-endpoints --vpc-endpoint-ids "$S3_ENDPOINT"
aws rds delete-db-subnet-group --db-subnet-group-name lab-db-subnets

# 5. Security groups (in reverse order of references)
aws ec2 delete-security-group --group-id "$DB_SG"
aws ec2 delete-security-group --group-id "$APP_SG"
aws ec2 delete-security-group --group-id "$ALB_SG"

# 6. Subnets
for s in "$SUBNET_PUB_A" "$SUBNET_PUB_B" "$SUBNET_APP_A" "$SUBNET_APP_B" \
         "$SUBNET_DATA_A" "$SUBNET_DATA_B"; do
  aws ec2 delete-subnet --subnet-id "$s"
done

# 7. Route tables, internet gateway, and VPC
aws ec2 delete-route-table --route-table-id "$RT_PUBLIC"
aws ec2 delete-route-table --route-table-id "$RT_APP"
aws ec2 delete-route-table --route-table-id "$RT_DATA"
aws ec2 detach-internet-gateway --internet-gateway-id "$IGW_ID" --vpc-id "$VPC_ID"
aws ec2 delete-internet-gateway --internet-gateway-id "$IGW_ID"
aws ec2 delete-vpc --vpc-id "$VPC_ID"
If a security group won’t delete: the load balancer’s network interfaces can take a few minutes to disappear. Wait and try again.
Prefer the console? Delete the load balancer, target group, instances, and any NAT gateway first. Then deleting
lab-vpcfrom the VPC console removes its subnets, route tables, security groups, and internet gateway in one go.
✅ Final checkpoint: No lab- resources remain in the EC2 or VPC consoles, and no Elastic IPs are left under Elastic IPs.
Troubleshooting
Targets stay unhealthy
Cause: the web server didn’t start, or lab-app-sg doesn’t allow port 80 from lab-alb-sg. Fix: check the security group rule. Then, in the EC2 console, choose the instance, then Actions → Monitor and troubleshoot → Get system log, and look for user data errors.
curl hangs
Cause: lab-alb-sg doesn’t allow port 80 from the internet, or the load balancer isn’t in the public subnets. Fix: check the rule and the load balancer’s subnets.
InvalidParameterValue for the image ID
Cause: an older AWS CLI that doesn’t support resolve:ssm:. Fix: update the AWS CLI, or look up the AMI ID with aws ssm get-parameter.
DependencyViolation during cleanup
Cause: something still uses the resource. Fix: follow the cleanup order, and wait for load balancer network interfaces to disappear.
What you accomplished
- ✅ Built a two-AZ VPC from scratch with public, private, and isolated subnets
- ✅ Made subnets public or private using nothing but route tables
- ✅ Chained security groups so each tier accepts traffic only from the one before it
- ✅ Ran app servers with no public IP, reachable only through a load balancer
- ✅ Prepared isolated database subnets and a free S3 gateway endpoint
This network shape — public load balancer, private app, isolated data — is the foundation for every remaining phase.
Quick self-check
Test yourself before moving on:
- Which single route made the public subnets public?
- Why can’t anyone on the internet connect to the app servers, even if a security group were misconfigured?
- Why do the app and database rules reference security groups instead of IP ranges?
- What would you add so the app servers can download packages?
Answers
0.0.0.0/0to the internet gateway inlab-rt-public.- They have no public IP and sit in subnets with no route to the internet gateway.
- Any number of instances carrying the referenced group is allowed — and nothing else.
- A NAT gateway in a public subnet, with a
0.0.0.0/0route to it from the app route table.
What’s next
Phase 4 is all about compute: EC2 in depth, load balancers and Auto Scaling, containers, Kubernetes, and serverless. Its lab deploys a containerized API to ECS Fargate behind an Application Load Balancer — in a network shaped exactly like this one.
Did you try the AZ failure test? Tell me how long failover took in the comments.